Depending on the POS functions you use in Idealpos, you may need to set other functions including Paid Out, Received on Account and Freight and Admin Fees to work correctly with MYOB.
The Paid-Out function can be used to:
The Received on Account function can be used to:
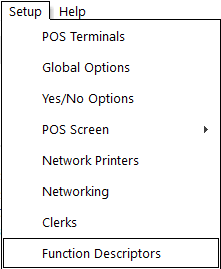
You can create up to 4 Paid Out functions and 4 Received on Account functions within Idealpos. To change the description of these functions, go to Setup > Function Descriptors.
Highlight the function and select “Modify”.
Amend the description as required and select “Save”.
Admin and Freight fees are sometimes recorded separately on your Supplier Invoices. You can send these across separately to MYOB using Purchase Categories. After the Purchase Categories are created, you can set them as your default Purchase Categories.
Go to Setup > Global Options > Purchases.
To set the Tax Rate and Tax Labels in POS go to Setup > Global Options > Sales.
Set the Label description for GST to ‘GST’ and GST FREE to ‘FRE’. These Labels must match the tax code in MYOB.
To check the tax codes in MYOB, go to Lists > Tax Codes
When a sale is made, you can apply various types of discounts and surcharges; and when using customer loyalty, you are able to purchase goods with your accumulated loyalty points. These discounts, surcharges and point redemptions are subtracted or added from the Gross Sales to produce the NETT Sales.
Idealpos sends the NETT Sales to MYOB. GST and GST Free sales are separated.
ALL Sales Reports will match Financial Report NETT Sales Total
Stock Items Sales Total balance with Financial Report
In order for the sales to be transferred to MYOB, you must perform an ‘End of Shift’ at each POS Terminal.
At the end of the day/shift, press the ‘End of Shift’ button under Manager > End of Shift.
The Cash Declaration window will appear. You can either count the money in the cash drawer at this time, or press OK, leaving the cash declaration window empty, and you can complete the cash declaration from a back-office PC, which has the MYOB Accounting Module installed on it.
You can enable the ‘Delay Cash Declaration Count’ option which will change the behaviour of the End of Shift function. Instead of the Cash Declaration windows appearing immediately after pressing the End of Shift button, a message box will appear to notify the Clerk to remove the cash drawer and count the money.
End of Shift is assigned to the Clerk who performed the function, and the Clerk is not able to log-on to any POS terminal on the network until they have completed the End of Shift procedure. The Clerk can finish their End of Shift at another POS Terminal on the network.
Sites have been introduced to group certain functions within Idealpos. Sites affect the reconciling of sales data as each POS Terminal is linked to a site. By default, all POS Terminals are linked to Site 1 in the database. You can create multiple sites and link your POS Terminals to a Site.
If you decide to use multiple Sites, the End Sales Period screen will only show the End of Shifts from the site your POS Terminal is linked to.
To create new Sites or modify existing go to Setup > Sites.
Select ‘Add’. You are only required to enter the description of the Site.